Microsoft Azure DevOps Services is a cloud-hosted platform that provides end-to-end DevOps capabilities for building software, from planning through deployment. The platform employs a number of security concepts and controls to ensure your projects are safe, private, and available.
This blog provides a checklist you can use to enforce the security of your environment in Azure DevOps, and make the most of the platform.
1. Control Access
You should control access to your Azure DevOps Services environment by assigning and publishing roles and responsibilities. By stipulating clear lines of duties, you can minimize the confusion that can lead to human and automation mistakes that can cultivate security risks. It’s the best way of ensuring that only authorized users can access the functions, features, and data of the specified Azure DevOps assets.
Azure DevOps Services provides two main inter-connected ways of controlling and governing users’ access:
- Permission management
- Access level management
a) Permission management
Permissions in Azure DevOps either permit or deny access to a feature. They can be set at various levels for most objects within the platform, such as area paths, pipelines, and repositories. If users are added to a security group, they inherit the permissions assigned to that group. A security group defines the scope of tasks its members can undertake.
If you create an organization, collection, or project, Azure DevOps also automatically creates a set of default security groups with default permissions. You can also create custom security groups with your own defined permissions.
For example, to find the security groups, start by clicking Project settings on your project’s dashboard sidebar:

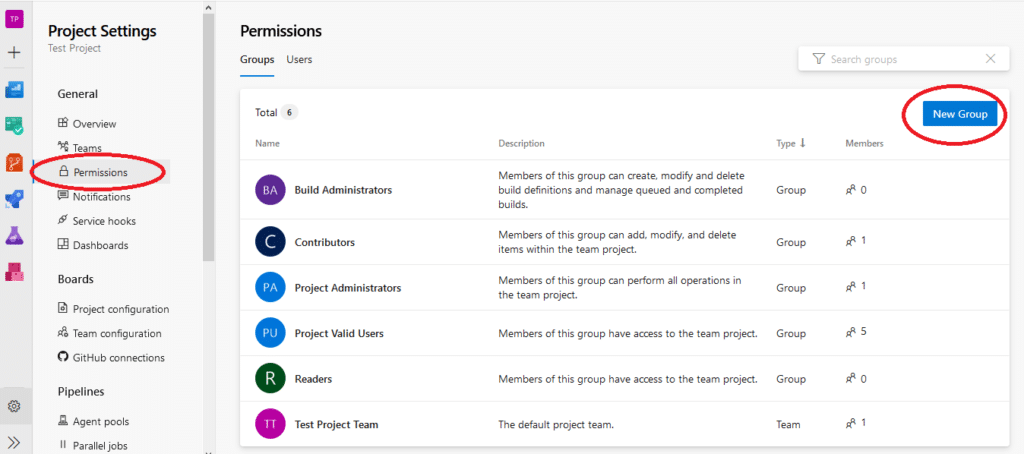
Then, under the General section, select the Permissions option:

You’ll see a list of the built-in security groups. You can click on any of them to set and edit specific permissions, add users to the group, or configure other settings. You can also click the New Group button to create a customized permission group.
For example, here are the settings specific to the default Build Administrators security group:

b) Access level management
Access levels in Azure DevOps Services allow or deny access to the platform’s features. This is in addition to the permissions set via security groups.
These are the access levels supported:
- Basic—provides access to most of the platform’s features.
- Stakeholder—provides partial access. It’s suitable for users who require access to a limited set of the platform’s features.
- Visual Studio Subscriber—this is assigned to users who already have a Visual Studio subscription.
To give users access to your organization, start by going to your organizations’ dashboard. Then, after selecting your preferred organization, click Organization settings on the sidebar:

Next, under the General section, select the Users option. On the ensuing page, click the Add users button.

On the resulting popup, add the new user(s) details, while defining their access level. Lastly, click the Add button to complete the invitation.

Once you’ve added a user, you can view and edit some of their information. For example, if you want to manage a user, just click the More… ellipsis at the end of the user’s information. Then, you’ll be able to complete various user management tasks, including changing their access level.

2. Control Visibility
Azure DevOps Services allows you to change the visibility of your projects from public to private, and vice-versa. If users have not signed in to your organization, they have read-only access to your public projects. Conversely, if users have signed in, they can be granted access to private projects and make any permitted changes to them.
There are two ways of controlling the visibility of projects in Azure DevOps:
- Using project settings
- Using organization settings
a) Using project settings
On your project’s dashboard, click Project settings on the sidebar:

Next, under the General section, select the Overview option. You’ll then find the Visibility setting on the top level of the page. You may set your desired visibility status here, either public or private. Finally, click the Save button to complete the changes.

b) Using organization settings
On your organizations’ dashboard, select your preferred organization and click Organization settings on the sidebar:

Next, under the Security section, select the Policies option. On the ensuing page, under Security policies, you can toggle the button on or off.

If the button is on, it enables anonymous access to your organization’s projects. On the other hand, if it’s off, it disables public access to your organization’s projects.
3. Protect Repositories From Tampering
Azure DevOps allows you to enact policies that safeguard your project’s repositories and branches from tampering.
These are the tasks you can do to protect your repositories from tampering:
- Set repository and branch policies
- Set repository and branch permissions
- Disable forking
a) Set repository and branch policies
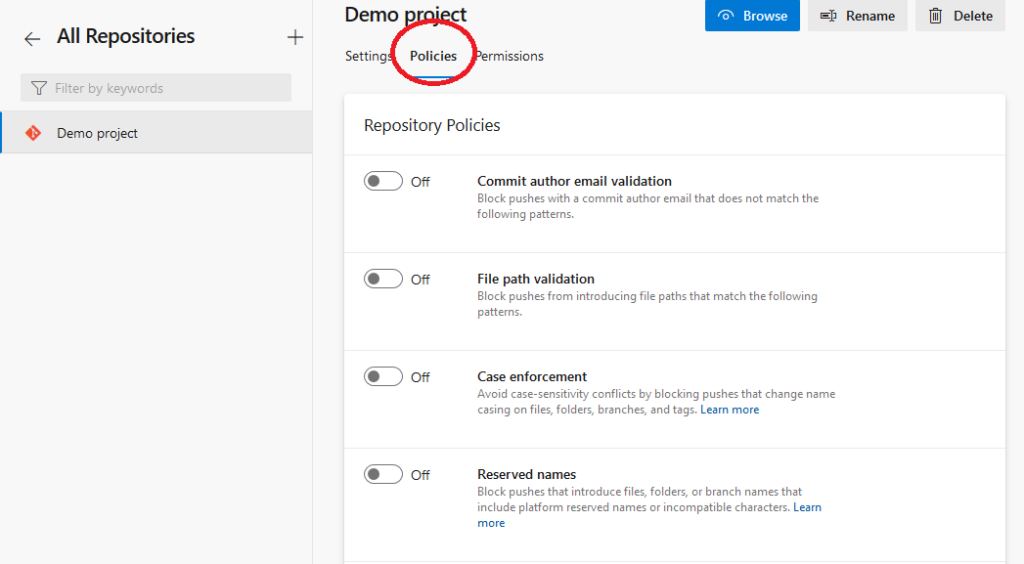
To set the policies, start by navigating to your Project Settings menu. Next, on the Repos section, click the Repositories option. Choose the Policies tab and set your desired protection policies for all repositories in your project.

For example, if you want to block pushes from commit authors with suspicious email addresses, you can activate the Commit author email validation policy and set the necessary conditions. You may also set the File path validation policy to safeguard your repository from commits with sensitive content.
If you scroll down the same page to the Branch Policies section, you can create project-wide branch policies. Creating and merging branches may introduce insecure code into your project’s main branch. So, configuring branch policies can minimize the risk, enforce change management standards, and improve your team’s code quality.
To add branch protection policies applicable across all repositories in your project, click the plus (+) button:

Next, you’ll be provided with a popup that requires you to select how you wish to protect your branches:

If you select the first option (“Protect the default branch…”), and click the Create button, you’ll be directed to a page where you can configure the project-wide branch policies.

An important security policy you should always activate is the Require a minimum number of reviewers. This policy prohibits committing any code changes to the main branch before other developer(s) completes a review.
You can also configure security policies specific to each repository or branch, instead of project-wide policies. To do so, navigate to the Repositories tab and select your preferred repository:

Next, select the Policies tab and configure policies specific to your chosen repository.

If you scroll down the same page to the Branch Policies section, you can select a branch and configure its specific protection policies.

b) Set repository and branch permissions
Another task you can do to protect your repositories from tampering is to set their permissions. To do so, go to the Permissions tab and tweak the permissions you want to enforce on all the repositories in your project.

You can also choose a specific repository and tweak its permissions individually:

If you scroll down the same page, you can select a branch and configure its specific permissions:

c) Disable forking
Forks are a great way of letting developers freely try out changes without affecting the original repository. However, forks may cause security risks to your project.
Primarily, it’s difficult to keep track of the security of each fork, especially if your repository has a high number of forks. Also, if a user forks a copy of your repository to their private account, it further complicates tracking its security.
So, you may consider preventing users from automatically creating forks from your repository. To do so, select your preferred repository and, under the Settings tab, toggle the Forks setting to off.

4. Review Audit Logs
Azure DevOps Services provides audit logs that occurred throughout your organization within the last 90 days. This allows you to check for anomalies or suspicious activities that may affect the platform’s security.
Audit events are recorded whenever a user within your organization makes changes to the state of an artifact. Examples include modifying policies or permissions, accessing features, creating resources, removing resources, and many others.
To review audit logs, start by going to your organizations’ dashboard. Next, select your preferred organization and click Organization settings on the sidebar:

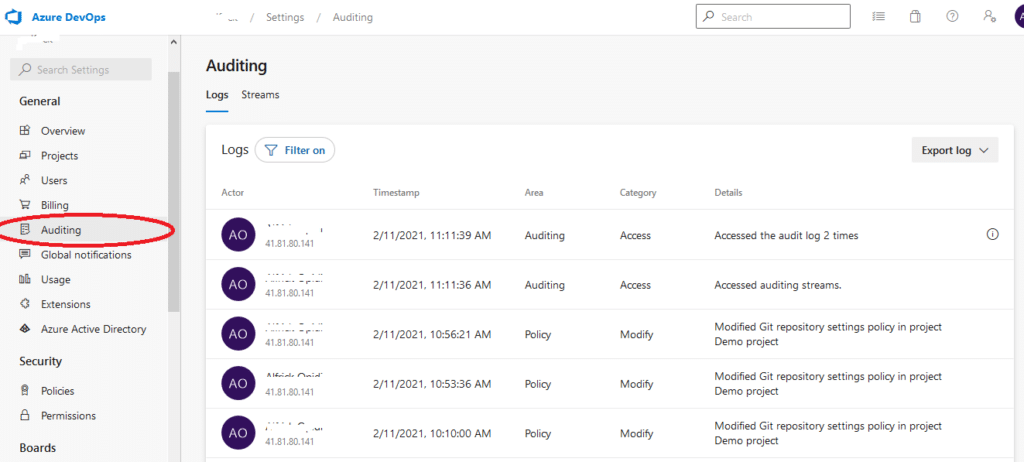
Next, under the General section, select the Auditing option. On the ensuing page, you can review, filter, and export the audit events that occurred throughout your organization.

5. Implement Web Application Firewalls (WAFs)
Web Application Firewalls (WAFs) can protect your Azure DevOps Services deployment. If you configure WAFs, they can filter, monitor, and block any malicious web-based traffic to and from your Azure DevOps Services.
A WAF will apply a set of rules that inspects the Azure DevOps traffic and detects any anomalies. This prevents intruders from carrying out different types of attacks, such as cross-site scripting and SQL injection.
6. Use Mend Bolt
Mend Bolt is a powerful extension that can help you reinforce the security of your Azure DevOps instance. It’s a free extension that automatically scans your projects and identifies security issues with the open source components. It’s the tool you need to leverage the power of open source technologies without putting your projects at risk.
Integrating Mend Bolt with Azure DevOps will provide you with the following benefits:
- Receive real-time alerts on open source security vulnerabilities.
- Receive recommendations for easily fixing vulnerable open source components.
- Ensure the license compliance of open source components, including all dependencies’ licenses.
- Receive up-to-date open source inventory reports for every build or project.
Conclusion
You can keep your Azure DevOps Services environment secure by controlling access, controlling visibility, protecting repositories from tampering, reviewing audit logs, and implementing WAFs.
Additionally, using the free Mend Bolt extension can help you identify vulnerable open source components in your project and safeguard your codebase from unauthorized intrusions.
Are you letting open-source vulnerabilities go undetected?
Mend Bolt is a powerful free extension that operates in real-time to provide visibility over your open source components within Azure Pipelines or GitHub.
- Get real-time alerts on security vulnerabilities
- Ensure the license compliance of open source components.
- Receive automated open-source inventory reports for every build or project.
Get it now and join thousands of developers who’ve already gained full visibility over their open-source components.


